REVIEW · PUERTO VALLARTA
Puerto Vallarta: Baby Turtle Release in Conservation Area
Book on GetYourGuide →Operated by Vallarta Bionature Tours · Bookable on GetYourGuide
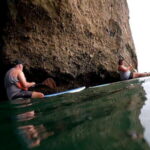
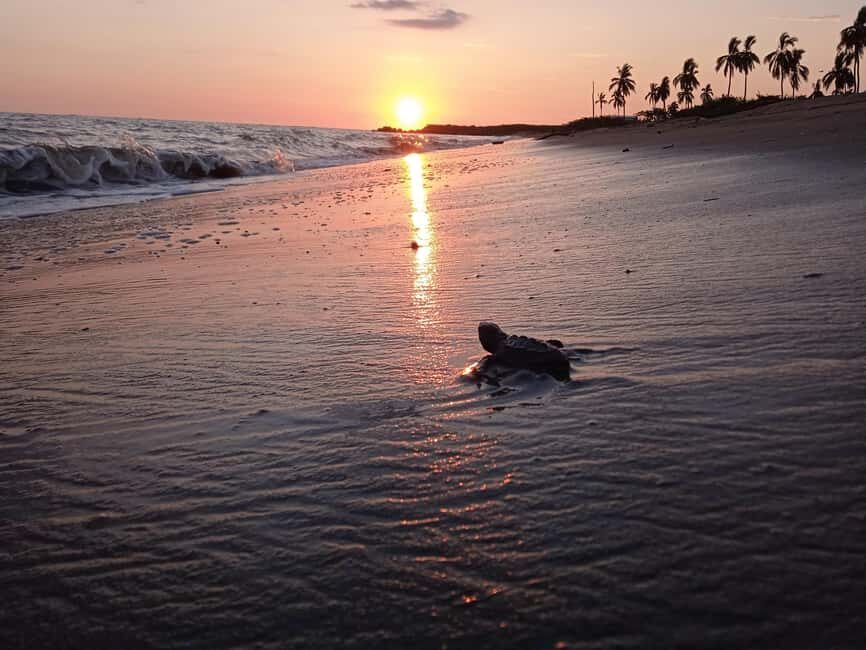
Sea turtles have a way of grabbing you. This Puerto Vallarta baby turtle release takes you into a local conservation area to learn how olive ridley turtles nest, how eggs are handled, and what actually happens right before hatchlings make a break for the sea. I especially like the hands-on feel and the way guides (often Eduardo) explain the process in both English and Spanish.
The best part is stepping into the moment: you watch a sunset over the bay, then participate in releasing baby turtles that hatched that morning. One consideration: it’s not a smooth, polished “tour bus” setup. You’re walking in sand/paths, and facilities can be basic (some guides note limited or not-great restroom conditions), plus it’s not a good match for people with mobility limits or breathing issues.
In This Review
- Key things I’d circle in your planning
- Where the olive ridley work happens (and why this tour is different)
- Getting to the meeting point without stress
- The 15-minute walk: your warm-up to the conservation area
- Campsite teaching: how eggs go from nest to incubation
- Wildlife viewing time: spotting what conservation protects
- The sunset over the bay: when the moment turns quiet
- Watching hatchlings and participating in the baby turtle release
- The role your guide plays: Eduardo (and the team)
- Price and value: what $40 gets you (and what to double-check)
- What to bring (so you actually enjoy it)
- Who this is best for (and who should skip it)
- Small realities on the ground (yes, including restrooms)
- Should you book Puerto Vallarta baby turtle release?
- FAQ
- How long is the Puerto Vallarta baby turtle release experience?
- How much does it cost?
- What species will I learn about and release?
- Do I need transportation from the hotel?
- Where is the meeting point?
- What happens if no turtles hatch on my scheduled day?
- Is the activity suitable for young children?
- What should I bring?
- Are there any restrictions?
- What about photos?
Key things I’d circle in your planning
- Olive ridley focus: you learn the life cycle of the species locally nesting in the area
- Egg collection and incubation demo: you see how conservation staff prepare eggs for hatching
- Sunset timing: the bay views make the hatch-and-release moment feel extra meaningful
- You get to release hatchlings: it’s participatory, not just a viewing session
- Guides who teach in two languages: English and Spanish during the full experience
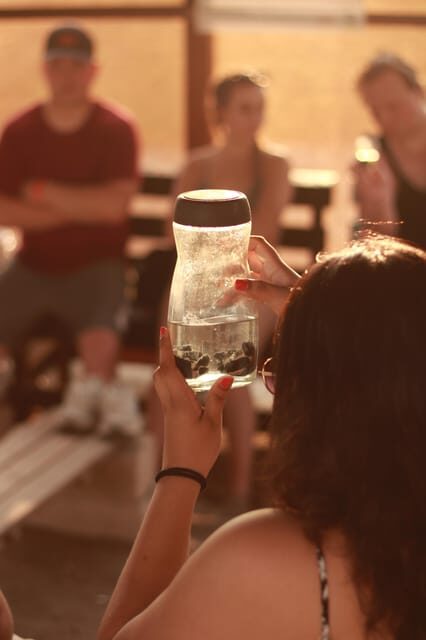
- Photos included: a photographer captures your release moment (with possible extras depending on what you want to keep)
Where the olive ridley work happens (and why this tour is different)
If you care about turtles but dislike wildlife “performances,” this is the kind of activity that makes sense. The whole point here is conservation work tied to nesting habitat. You’re not just sightseeing in the area—you’re learning how eggs are found, handled, incubated, and then released when hatchlings are ready.
That matters because sea turtles don’t need luck. They need protection across lots of small risks: nests being missed, eggs getting damaged, hatchlings facing unsafe conditions, and human pressures that reduce survival chances. This experience turns that abstract idea into a simple, watchable story: what the workers do, why they do it, and how your presence supports the conservation site.
I also like that the emotional peak is built into the schedule. You get teaching and observation before the release. By the time you’re holding your spot for the hatchling moment, you’re not guessing what you’re looking at.
You can also read our reviews of more tours and experiences in Puerto Vallarta.


Getting to the meeting point without stress
The meeting point is at the end of Paseo Bocanegra street, and the easiest access is through the Marina Vallarta area. You’ll go in via Albatros street, cross Paseo Bocanegra, and keep going straight until the end.
The area has a “find-it-in-the-last-minute” vibe, so do yourself a favor:
- If you arrive early, wait where they tell you to wait and don’t wander to the campground alone.
- Look for a golf course, a wall with drawings, and the beach at the end.
Transportation isn’t included, so plan on getting there on your own (Uber/taxi works based on how people commonly handle the last stretch).
This tour also includes a walk of about 15 minutes each way. It’s not a long hike, but it is walking on uneven paths. If your knees don’t love sand or uneven ground, plan accordingly.
The 15-minute walk: your warm-up to the conservation area
That walk is more than a transfer. It’s the first step in changing your mindset from vacation mode to “work happens here” mode. You’re moving from the more public side of the area toward the conservation campsite where staff track nests.
You’ll also have a chance to settle in—because the schedule gets busy once you arrive. Think of it as your buffer time before classroom learning, wildlife viewing, and the later release moment.
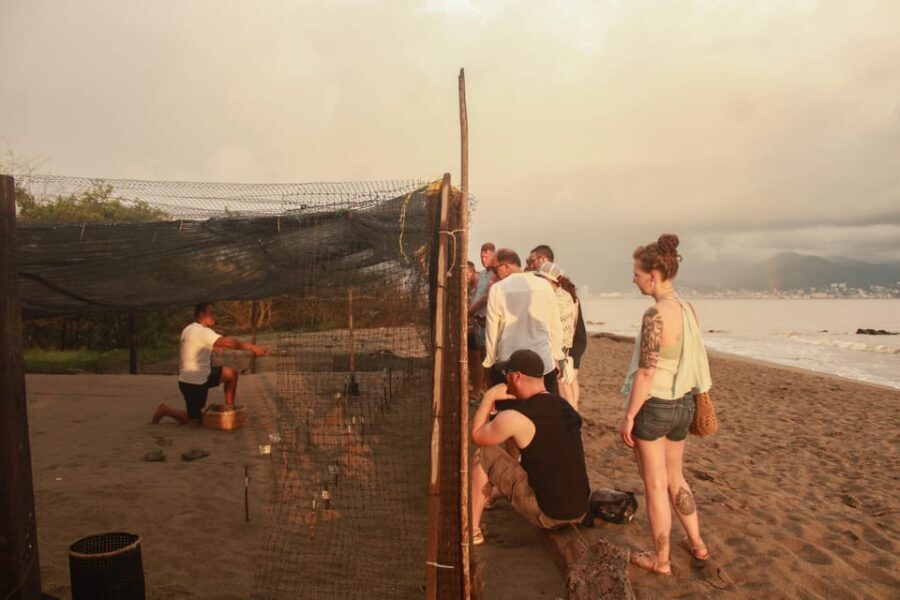
Campsite teaching: how eggs go from nest to incubation
Once you reach the campsite, the program shifts into structured learning. Expect about 45 minutes of class and then additional wildlife viewing time.
What you’re learning is the practical side of conservation:
- how workers search for nests and eggs
- how eggs are collected for protection
- how eggs are incubated until hatching time
- how the olive ridley life cycle fits into the season
This isn’t just “pretty turtle facts.” It’s about the daily decisions that affect survival. And that makes the release portion feel less like a gimmick and more like the final step of a chain of care.
One thing I appreciate: the guides don’t treat kids and adults like separate audiences. The lessons are timed so everyone can stay with it—even if you’re watching the group’s attention span like I do.
Wildlife viewing time: spotting what conservation protects
After the classroom portion, you’ll get a block of wildlife viewing (about 20 minutes). This is where you slow down and look, because the work you heard about is happening in real space.
Even when the most dramatic moment is still ahead, this portion helps you connect the dots. You start to understand why a conservation site cares about habitat integrity, nighttime nesting patterns, and minimizing disturbances.
If the weather shifts, don’t panic. The program is designed around the natural window of hatching and release, and conditions can change. The important thing is that you’re present and attentive during the viewing and education blocks.


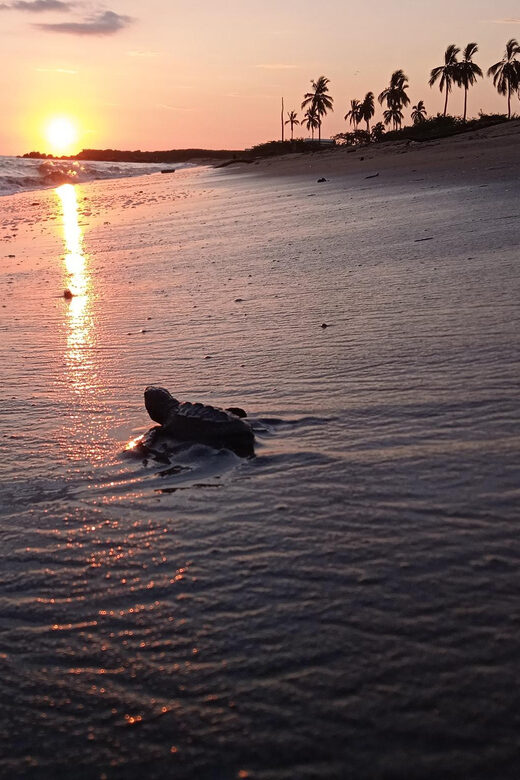
The sunset over the bay: when the moment turns quiet
Here’s where the tour earns its emotional weight. After the education and viewing, you get time with the sunset backdrop—picturesque views of the bay—while the hatchling activity is underway.
This is also the point where you’ll notice how the guides pace the group. They want you focused. The sky helps. So does the fact that you’re about to see something fragile and time-sensitive.
And if you get even a slightly stormy evening? Some groups have reported weather passing quickly, with enough time to see the sunset and hatchlings afterward. That’s not guaranteed, but the overall structure is built to work with real conditions, not perfect ones.
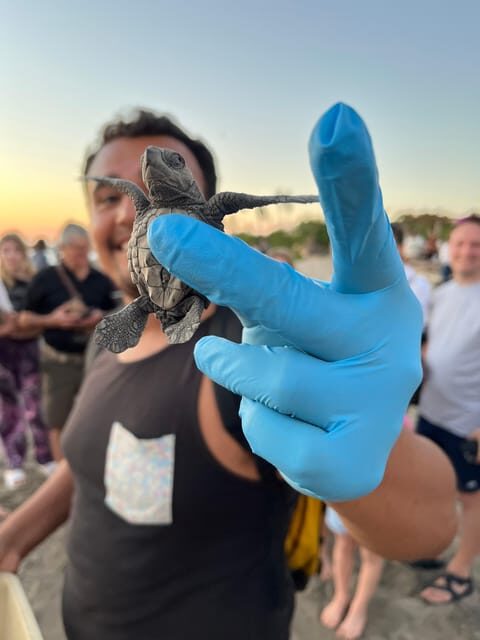
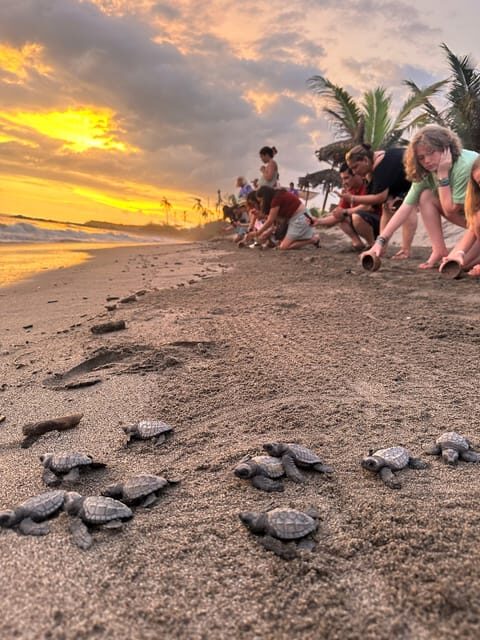
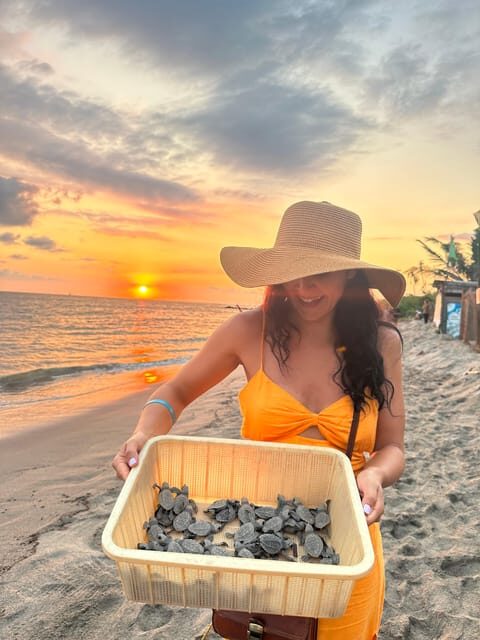
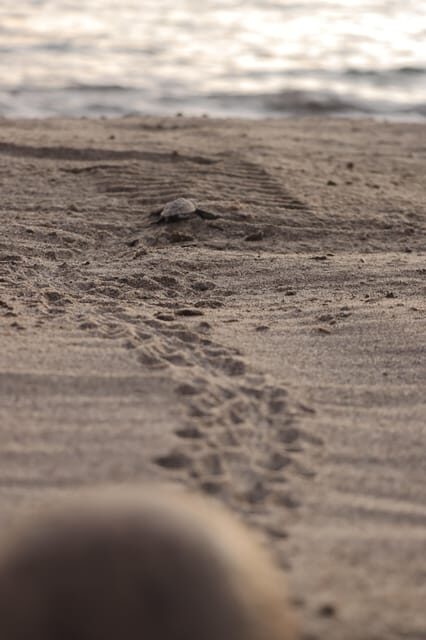
Watching hatchlings and participating in the baby turtle release
The headline is the release: you help set baby turtles on their way into the ocean after they hatch that day.
If you’re wondering what you’re actually doing, think “participating in a guided, conservation-run process,” not “doing a dramatic selfie action.” Your guide will keep the group moving and explain what matters as hatchlings move from sand toward water.
Many people describe the moment as magical—and I get it. But what makes it more meaningful is the context you just learned:
- eggs are vulnerable
- incubation is careful work
- hatchlings need the right timing and a safe route
Your participation becomes part of a bigger goal: giving hatchlings a better start thanks to protection and handling by the conservation workers.
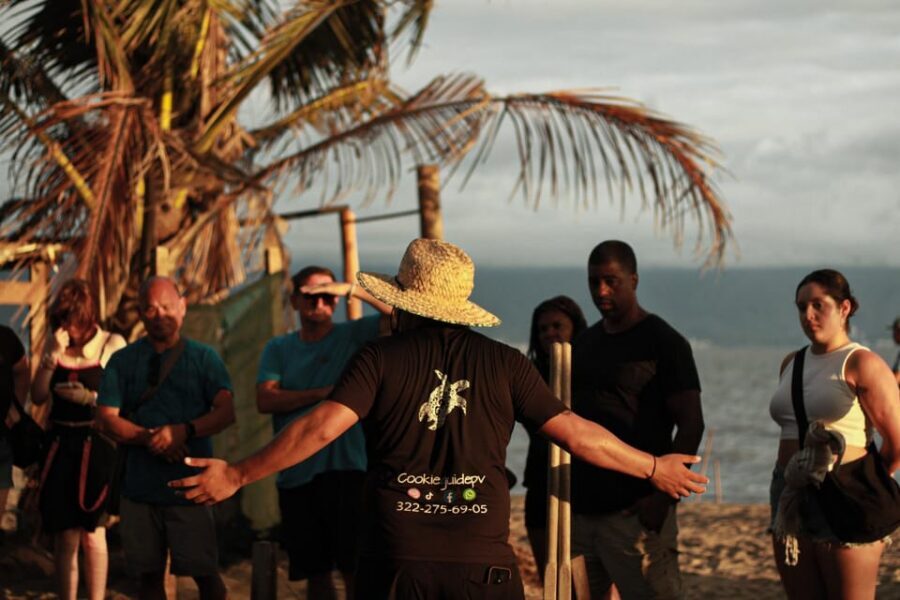
The role your guide plays: Eduardo (and the team)
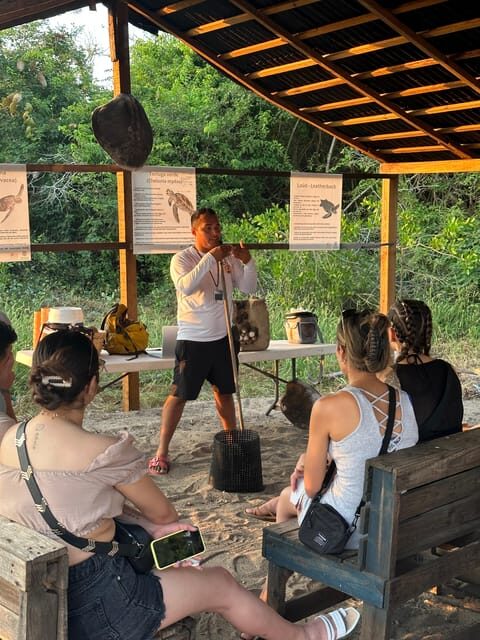
A big reason this tour consistently lands high marks is the guiding. Eduardo is named repeatedly as a passionate, engaging lead who can keep groups with different ages on track. People also mention bilingual delivery—English and Spanish—so the whole group understands what’s happening.
You may also meet other staff members who support the process (names like Tony and Carlos show up in participant notes). The common thread is the same: you’re not shuffled through. You’re taught, monitored, and guided.
That matters because the release moment has emotional intensity. You want someone who can keep everyone calm, help you follow instructions, and ensure hatchlings get handled appropriately.
Price and value: what $40 gets you (and what to double-check)
At $40 per person for about 2.5 hours, the value comes from three things you rarely get together:
- Education tied directly to what you’ll do at the end
- A real conservation workflow demo (nests, eggs, incubation)
- Participation in releasing hatchlings, plus photos captured by a photographer
Photos are included, but do pay attention to how they’re delivered. Some participants note that photos are taken during the activity, and there may be extra cost if you want to keep or download them in a particular way. Before you go, ask what’s included with the tour photos versus what costs extra.
Also remember: transportation isn’t included. If you’re staying far from the meeting point, your taxi/Uber adds to the total. Still, when you spread the cost across the guided teaching + release + photos, it usually feels fair.
And yes—if there are no hatchlings on your exact day, you’ll need to be ready to reschedule (more on that in the FAQ). That’s the nature of wildlife conservation work. When it lines up, it’s spectacular.
What to bring (so you actually enjoy it)
This is the part that makes or breaks your experience. The program asks you to bring:
- Biodegradable sunscreen
- Comfortable clothes
- Insect repellent
Add your own common sense layer:
- Wear shoes you don’t mind getting sandy.
- Bring water if you’re picky about how you feel in heat, even though water is included.
- If you burn easily, sunscreen matters more than you think.
Drones aren’t allowed, and alcohol and drugs aren’t allowed. That keeps the environment focused and respectful.
Who this is best for (and who should skip it)
This tour is built for people who can handle walking and want a conservation-forward experience. It’s not suitable for:
- children under 5 (they can observe without participating, but under-5 pricing may differ)
- people with mobility impairments or wheelchair users
- people with respiratory issues
- people with animal allergies
- people with high blood pressure
- people with low level of fitness
If you’re going with kids, ages around 5–10 often seem like a sweet spot because they can stay engaged during the class and genuinely love the release moment.
If you’re going as a couple or solo traveler, you’ll still find plenty to enjoy. It’s not just for families, but the guided pacing helps everyone.
Small realities on the ground (yes, including restrooms)
Most of the feedback is about the education and the release. Still, one practical heads-up: the facilities in the area can be basic. Some participants mention porter potties with broken doors and no toilet paper.
That’s not the focus of the tour, but it’s useful information. If you’re sensitive to restroom conditions, bring what you can in a discreet, compliant way (and keep it light).
Also, don’t arrive expecting a smooth “beach club” setup. This is a working conservation site. That’s part of why it feels authentic.
Should you book Puerto Vallarta baby turtle release?
I think you should book this tour if you want:
- a conservation experience with real educational context
- a hands-on moment that connects directly to the work behind it
- a strong chance to see the hatch-and-release window thanks to the site’s daily routine
Skip it (or consider another option) if:
- you can’t do uneven walking for the walk segments
- you have breathing issues or high blood pressure concerns
- you strongly dislike basic, field-style conditions
If you’re flexible on dates, book earlier in your trip if possible. The hatchlings are nature’s schedule, not yours. When it works, it’s the kind of Puerto Vallarta activity you’ll remember for years.
FAQ
How long is the Puerto Vallarta baby turtle release experience?
It lasts about 2.5 hours.
How much does it cost?
The price is $40 per person.
What species will I learn about and release?
The program focuses on the olive ridley sea turtle.
Do I need transportation from the hotel?
Transportation is not included. You’ll need to get yourself to the meeting point.
Where is the meeting point?
It’s at the end of Paseo Bocanegra street, with the best access through the Marina Vallarta area (via Albatros street, then cross Paseo Bocanegra and go straight to the end).
What happens if no turtles hatch on my scheduled day?
If no turtles hatch, you can reschedule or cancel.
Is the activity suitable for young children?
Children under 5 years old do not have to pay for a ticket, but they can only observe the release without participating.
What should I bring?
Bring biodegradable sunscreen, comfortable clothes, and insect repellent.
Are there any restrictions?
Drones are not allowed, and alcohol and drugs are not allowed.
What about photos?
Photos are included, and a photographer takes them during the experience. Some participants note there may be extra cost depending on what you want to keep, so it’s smart to check.
If you tell me your travel dates and whether you’re going with kids or anyone with mobility/health concerns, I can help you decide if this fits your plans and what to prioritize.